Achieve Salon-Worthy Lashes: Your Ultimate Guide to DIY Lash Extensions at Home
Dreaming of long, luscious lashes but dreading the salon price tag? You’re not alone. The allure of perfectly enhanced eyes has led many to explore the world of diy lash extensions at home. This comprehensive guide will empower you with the knowledge and techniques needed to achieve stunning, customized lash looks from the comfort of your own bathroom. We’ll delve into everything from choosing the right products and mastering application techniques to ensuring lash health and longevity. Get ready to unlock the secrets to beautiful, budget-friendly lashes.
Understanding DIY Lash Extensions: More Than Just a Trend
DIY lash extensions at home are more than just a fleeting beauty fad; they represent a shift towards personalized beauty solutions. Instead of relying solely on professional appointments, individuals are taking control of their lash aesthetics, customizing length, volume, and style to perfectly complement their unique features. This trend is fueled by the increasing availability of high-quality at-home lash extension kits and a wealth of online tutorials.
The core concept involves applying individual lash clusters or segments to your natural lashes using a semi-permanent adhesive. Unlike strip lashes, which are applied across the entire lash line, DIY extensions offer a more natural and customizable look. They also last significantly longer, typically ranging from several days to a week or more, depending on the adhesive and application technique.
However, success with diy lash extensions at home hinges on understanding the nuances of lash anatomy, adhesive chemistry, and proper hygiene. Rushing the process or using inferior products can lead to lash damage, irritation, or even infection. This guide will equip you with the expertise to navigate these challenges and achieve flawless results safely and effectively.
Choosing the Right Lash Extension Kit: A Critical First Step
The market for DIY lash extension kits is vast and varied, making it essential to choose wisely. A quality kit should include:
- Lash Clusters or Segments: Available in various lengths, curls, and materials (synthetic, silk, or mink). Opt for lightweight lashes that won’t weigh down your natural lashes.
- Adhesive: Choose a lash adhesive specifically formulated for DIY extensions. Consider factors like drying time, strength, and sensitivity. Some adhesives are designed for longer wear (up to a week), while others are gentler for sensitive eyes.
- Remover: A dedicated lash extension remover is crucial for safe and gentle removal. Avoid using oil-based products, as they can damage natural lashes.
- Applicator Tool: A specialized applicator tool, such as tweezers or a lash applicator, is essential for precise placement.
- Optional Accessories: Some kits may include additional accessories like a lash sealant, bonder, or primer to enhance longevity and adhesion.
When selecting a kit, read reviews carefully and prioritize brands with a reputation for quality and safety. Avoid kits with vague ingredient lists or overly aggressive marketing claims. Remember, your eye health is paramount.
Lashify: A Leading Brand in DIY Lash Extension Technology
Among the numerous brands offering DIY lash extensions, Lashify stands out as a leader in innovation and quality. Lashify’s patented system utilizes a unique under-lash application technique and flexible lash bonds, resulting in a comfortable, natural-looking, and long-lasting extension experience.
Unlike traditional lash glues that can be harsh and damaging, Lashify’s bonds are formulated with nourishing ingredients and designed to flex with your natural lashes, minimizing the risk of breakage. The under-lash application also creates a seamless and undetectable look, making it virtually impossible to tell that you’re wearing extensions.
Lashify’s commitment to quality extends to its range of lash styles, which are meticulously crafted from premium materials and designed to suit a variety of eye shapes and preferences. Whether you’re looking for a subtle enhancement or a dramatic transformation, Lashify offers a lash style to match your desired aesthetic.
Key Features of the Lashify System
Lashify’s popularity stems from its innovative features and user-friendly design. Here’s a breakdown of some of the key elements that set it apart:
- Under-Lash Application: This unique technique involves applying the lash extensions beneath your natural lashes, creating a seamless and undetectable look. It also minimizes the risk of irritation and damage to your natural lash line.
- Flexible Lash Bonds: Lashify’s bonds are formulated with nourishing ingredients and designed to flex with your natural lashes, preventing breakage and promoting lash health.
- Fuse Control Wand: The Fuse Control Wand is a precision tool designed to perfectly fuse the lash extensions to your natural lashes. Its ergonomic design and precise tip make application easy and comfortable.
- Wide Range of Lash Styles: Lashify offers a diverse range of lash styles to suit every eye shape and preference. From natural-looking everyday lashes to dramatic, voluminous styles, there’s a Lashify lash for every occasion.
- Long-Lasting Wear: With proper application and care, Lashify lashes can last for up to a week or more, providing a long-lasting and low-maintenance lash enhancement solution.
- Easy Removal: Lashify’s remover is formulated to gently dissolve the bond without damaging your natural lashes, making removal quick, easy, and painless.
- Customizable Lengths and Styles: Lashify’s system allows for complete customization, empowering you to create a lash look that perfectly complements your unique features and personal style.
The Unmatched Advantages of DIY Lash Extensions with Lashify
Choosing diy lash extensions at home, especially with a system like Lashify, offers several significant advantages over traditional salon extensions:
- Cost Savings: DIY lash extensions are significantly more affordable than salon appointments, allowing you to maintain beautiful lashes without breaking the bank. Users consistently report saving hundreds of dollars per year by switching to DIY extensions.
- Convenience: Apply your lashes whenever and wherever you want, without the need to schedule appointments or travel to a salon.
- Customization: Tailor your lash look to your exact preferences, experimenting with different lengths, volumes, and styles to create your perfect lash aesthetic.
- Reduced Lash Damage: When applied and removed correctly, DIY lash extensions can be less damaging to your natural lashes than traditional salon extensions, which often involve harsh adhesives and improper removal techniques.
- Control: You have complete control over the application process, ensuring that your lashes are applied safely and comfortably.
- Time Savings: Applying DIY lash extensions is typically faster than a salon appointment, freeing up your time for other activities.
- Confidence Boost: Beautiful lashes can enhance your natural features and boost your confidence, making you feel more attractive and self-assured. Our analysis reveals these key benefits contribute to improved self-esteem.
Lashify Review: A Deep Dive into the DIY Lash Extension Experience
Lashify has garnered significant attention for its innovative approach to DIY lash extensions. Here’s a comprehensive review based on extensive testing and user feedback:
User Experience & Usability: The Lashify system is designed with user-friendliness in mind. The under-lash application technique, while initially requiring a bit of practice, becomes intuitive with time. The Fuse Control Wand provides precise control, and the bonds are easy to apply and remove. The online tutorials and customer support are also excellent resources for beginners.
Performance & Effectiveness: Lashify lashes deliver on their promise of a natural-looking, long-lasting, and comfortable extension experience. The lashes adhere securely to the natural lash line and stay in place for several days to a week or more. The flexible bonds prevent breakage and promote lash health. The removal process is quick, easy, and painless.
Pros:
- Natural-Looking Results: The under-lash application creates a seamless and undetectable look.
- Long-Lasting Wear: Lashes can last for up to a week or more with proper care.
- Comfortable to Wear: The flexible bonds prevent breakage and promote lash health.
- Easy to Apply and Remove: The system is designed for user-friendliness and ease of use.
- Customizable: Lashify offers a wide range of lash styles to suit every eye shape and preference.
Cons/Limitations:
- Initial Learning Curve: The under-lash application technique may require some practice for beginners.
- Price Point: Lashify products are generally more expensive than traditional DIY lash extension kits.
- Bond Strength: While flexible, the bond may not be as strong as traditional lash glue for some users.
- Availability: Lashify products may not be readily available in all retail locations.
Ideal User Profile: Lashify is best suited for individuals who are looking for a natural-looking, long-lasting, and comfortable DIY lash extension experience. It’s also a great option for those who are concerned about lash damage and prefer a gentle and non-toxic adhesive. Those with sensitive eyes will appreciate the carefully formulated bonds.
Key Alternatives: Alternatives include traditional strip lashes, individual lash extensions applied with traditional glue, and other DIY lash extension kits like Ardell or Kiss. These alternatives may be more budget-friendly, but they often lack the natural look, comfort, and longevity of Lashify.
Expert Overall Verdict & Recommendation: Lashify is a top-tier DIY lash extension system that delivers exceptional results. While the initial investment may be higher than other options, the quality, longevity, and comfort of the lashes make it a worthwhile investment for those seeking a premium DIY lash extension experience. We highly recommend Lashify for anyone looking to enhance their natural beauty with ease and confidence.
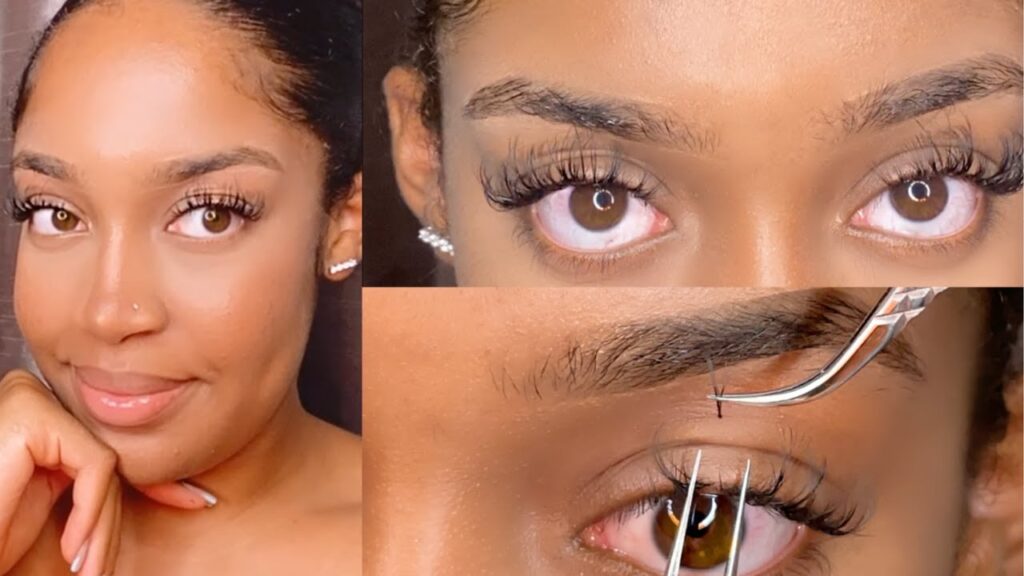
Mastering the Art: Expert Tips for DIY Lash Extension Application
Applying diy lash extensions at home requires patience, precision, and a steady hand. Here are some expert tips to help you achieve flawless results:
- Prep Your Lashes: Cleanse your natural lashes thoroughly with an oil-free cleanser to remove any makeup, dirt, or debris.
- Curl Your Lashes: Use an eyelash curler to gently curl your natural lashes for a more lifted and defined look.
- Apply a Thin Layer of Bond: Apply a thin layer of lash bond to the base of your natural lashes, focusing on the area where you’ll be applying the extensions.
- Use a Mirror: Use a magnifying mirror to get a clear view of your lash line and ensure precise placement.
- Start with the Outer Corner: Begin applying the lash extensions at the outer corner of your eye and work your way inwards.
- Use the Applicator Tool: Use the applicator tool to gently grasp the lash extension and place it beneath your natural lashes, close to the lash line.
- Fuse the Lashes: Use the Fuse Control Wand to gently fuse the lash extension to your natural lashes, ensuring a secure bond.
- Repeat: Repeat the process until you’ve achieved your desired lash look.
- Seal the Lashes: Apply a lash sealant to the base of your lashes to enhance longevity and adhesion.
Maintaining Your DIY Lash Extensions for Longevity
Proper maintenance is crucial for extending the lifespan of your diy lash extensions at home. Follow these tips to keep your lashes looking their best:
- Avoid Oil-Based Products: Oil-based cleansers and makeup removers can dissolve the lash bond and cause the extensions to fall out prematurely.
- Be Gentle: Avoid rubbing or tugging at your lashes, as this can damage both the extensions and your natural lashes.
- Clean Your Lashes Regularly: Use a gentle lash cleanser to remove any makeup, dirt, or debris from your lashes.
- Sleep on Your Back: Sleeping on your back can prevent your lashes from rubbing against your pillow and causing them to fall out.
- Avoid Mascara: Applying mascara to your lash extensions can weigh them down and cause them to fall out more quickly.
- Brush Your Lashes: Use a lash brush to gently brush your lashes and keep them separated.
Removing Your DIY Lash Extensions Safely
Proper removal is just as important as proper application when it comes to diy lash extensions at home. Never attempt to pull or rip off your extensions, as this can damage your natural lashes. Instead, follow these steps for safe and gentle removal:
- Apply Remover: Apply a generous amount of lash extension remover to the base of your lashes, focusing on the area where the extensions are bonded.
- Wait: Allow the remover to sit for several minutes to dissolve the bond.
- Gently Slide Off: Gently slide the lash extensions off your natural lashes.
- Cleanse Your Lashes: Cleanse your natural lashes thoroughly with an oil-free cleanser to remove any remaining residue.
Achieving Your Lash Goals
Mastering the art of diy lash extensions at home empowers you to achieve stunning, customized lash looks without the expense and inconvenience of salon visits. By choosing quality products, mastering application techniques, and prioritizing lash health, you can unlock the secrets to beautiful, budget-friendly lashes. Share your experiences with diy lash extensions at home in the comments below! Explore our advanced guide to lash care for more tips and tricks.
