Mastering Arduino Relays: A Comprehensive Wiring Guide
Embarking on electronics projects often involves controlling higher voltage or current devices than an Arduino can handle directly. This is where relays come into play. Learning how to wire a relay Arduino opens up a world of possibilities, from automating home appliances to building sophisticated robotics projects. This comprehensive guide provides a deep dive into the world of Arduino relays, covering everything from the fundamental concepts to practical wiring techniques and troubleshooting tips. We aim to provide the most complete, trustworthy, and user-friendly resource available online, building on years of experience in electronics and embedded systems.
Understanding Relays and Their Role in Arduino Projects
A relay is essentially an electrically operated switch. It allows a low-power circuit, like the one controlled by an Arduino, to control a high-power circuit, isolating the two to prevent damage. Relays are electromechanical devices consisting of a coil, a movable armature, and a set of contacts. When current flows through the coil, it generates a magnetic field that attracts the armature, causing the contacts to switch. This switching action can either close a circuit (normally open, NO) or open a circuit (normally closed, NC).
The history of relays is deeply intertwined with the development of telegraphy in the 19th century. They were initially used as signal boosters, repeating signals over long distances. Over time, relays have evolved significantly, with solid-state relays (SSRs) becoming increasingly popular due to their faster switching speeds and longer lifespan compared to electromechanical relays.
Core Concepts:
- Coil: The electromagnet that actuates the relay.
- Armature: The moving part that makes or breaks the circuit.
- Contacts: The switching points (NO, NC, and Common).
- Normally Open (NO): The circuit is open (disconnected) when the relay is not energized.
- Normally Closed (NC): The circuit is closed (connected) when the relay is not energized.
- Common (COM): The terminal that connects to either the NO or NC contact, depending on the relay’s state.
Advanced Principles: Understanding relay specifications is crucial for proper selection and operation. Key parameters include coil voltage, contact rating (voltage and current), switching time, and isolation voltage. Overloading a relay can lead to premature failure or even hazardous situations.
Current Relevance: Relays remain vital in modern electronics due to their simplicity, reliability, and ability to handle high voltages and currents. They are used extensively in automation, robotics, automotive systems, and industrial control applications. Recent trends include the integration of relays with microcontrollers for smart home and IoT applications.
Selecting the Right Relay Module for Your Arduino
When working with Arduino, it’s generally best to use a relay module rather than a bare relay. Relay modules offer several advantages, including built-in protection circuitry (such as flyback diodes) and convenient screw terminals for easy wiring.
A popular and reliable option is the Songle SRD-05VDC-SL-C relay module. This module is widely used in Arduino projects due to its compatibility with the Arduino’s 5V logic level, its compact size, and its robust performance. The Songle relay is an electromechanical relay that’s commonly found on many low-cost relay modules. It provides a simple and effective way to switch higher voltage or current loads using the Arduino’s low-voltage signals.
Expert Explanation: The Songle SRD-05VDC-SL-C relay module consists of the Songle relay itself, an optocoupler for electrical isolation, an indicator LED to show the relay’s state, and a flyback diode to protect the Arduino from voltage spikes when the relay coil is de-energized. The optocoupler provides crucial isolation between the Arduino and the high-voltage circuit, preventing damage to the Arduino in case of a fault in the high-voltage side.
Detailed Features of the Songle SRD-05VDC-SL-C Relay Module
Let’s break down the key features of the Songle SRD-05VDC-SL-C relay module:
- 5V Coil Voltage: The relay coil requires 5V to operate, making it directly compatible with the Arduino’s 5V output. This eliminates the need for additional voltage level converters.
- SPDT (Single Pole Double Throw) Contacts: The relay has three contacts: Common (COM), Normally Open (NO), and Normally Closed (NC). This allows for flexible switching configurations, enabling you to either open or close a circuit when the relay is energized. The user benefits from this flexibility by being able to control different types of loads with the same relay.
- Optocoupler Isolation: The optocoupler provides electrical isolation between the Arduino and the relay circuit. This protects the Arduino from voltage spikes and noise from the high-voltage side. The benefit is increased safety and reliability for the Arduino.
- Flyback Diode: The flyback diode protects the Arduino from voltage spikes that occur when the relay coil is de-energized. When the relay coil is switched off, the magnetic field collapses, generating a reverse voltage. The diode provides a path for this voltage to dissipate, preventing damage to the Arduino.
- LED Indicator: An LED illuminates when the relay is energized, providing a visual indication of the relay’s state. This is helpful for debugging and troubleshooting.
- Screw Terminals: The module has screw terminals for easy and secure wiring. This eliminates the need for soldering and makes it easy to connect and disconnect wires.
- Compact Size: The module is relatively small and compact, making it easy to integrate into various projects.
Advantages, Benefits, and Real-World Value of Using Relays with Arduino
Using relays with Arduino offers numerous advantages and benefits:
- Isolation: Relays provide electrical isolation between the low-voltage Arduino circuit and the high-voltage circuit being controlled. This protects the Arduino from damage and ensures safety.
- High Voltage/Current Control: Relays can control devices that require higher voltages or currents than the Arduino can directly provide. This allows you to control a wide range of devices, such as motors, lights, and appliances.
- Automation: Relays enable you to automate tasks by controlling devices based on Arduino code. This opens up possibilities for home automation, robotics, and industrial control.
- Flexibility: Relays offer flexible switching configurations with NO and NC contacts, allowing you to control different types of circuits and devices.
- Cost-Effectiveness: Relay modules are relatively inexpensive, making them a cost-effective solution for controlling high-power devices with Arduino.
- Durability: Electromechanical relays are known for their durability and ability to withstand harsh environments.
- Simplicity: Wiring and using relays with Arduino is relatively straightforward, making them accessible to beginners.
Users consistently report that using relays allows them to build more complex and functional projects that would be impossible to achieve with the Arduino alone. Our analysis reveals these key benefits: increased safety, greater control, and expanded project capabilities. For example, consider a home automation system where an Arduino controls the lighting. Without relays, this would be difficult and potentially dangerous. With relays, the Arduino can safely switch the high-voltage AC power to the lights, creating a smart and energy-efficient home.
Comprehensive Review of the Songle SRD-05VDC-SL-C Relay Module
The Songle SRD-05VDC-SL-C relay module is a popular choice for Arduino users, but how does it hold up in practice? Let’s take a closer look at its user experience, performance, and overall value.
User Experience & Usability:
From a practical standpoint, the module is very easy to use. The screw terminals make wiring a breeze, and the LED indicator provides a clear visual confirmation of the relay’s state. In our experience, even beginners can quickly get up and running with this module. The clear labeling on the module also helps to prevent wiring errors.
Performance & Effectiveness:
The module performs reliably and consistently. We’ve tested it with various loads, and it has consistently switched the circuits without any issues. The optocoupler provides excellent isolation, protecting the Arduino from voltage spikes. The relay switches quickly and cleanly, ensuring reliable operation.
Pros:
- Easy to Use: Screw terminals and clear labeling make wiring simple.
- Reliable Performance: Consistently switches circuits without issues.
- Excellent Isolation: Optocoupler protects the Arduino from voltage spikes.
- Visual Indication: LED indicator provides clear status.
- Cost-Effective: Affordable and readily available.
Cons/Limitations:
- Electromechanical: Slower switching speed compared to solid-state relays (SSRs).
- Limited Lifespan: Electromechanical relays have a finite number of switching cycles.
- Audible Click: The relay makes an audible click when switching, which may be undesirable in some applications.
- Contact Bounce: Electromechanical relays can experience contact bounce, which may require additional filtering in some applications.
Ideal User Profile:
This module is best suited for hobbyists, students, and makers who need a reliable and cost-effective way to control high-power devices with Arduino. It’s ideal for projects that don’t require extremely fast switching speeds and where the audible click is not a concern.
Key Alternatives (Briefly):
Solid-state relays (SSRs) offer faster switching speeds and longer lifespans but are generally more expensive. MOSFETs can also be used for switching, but they require more complex circuitry to provide isolation.
Expert Overall Verdict & Recommendation:
The Songle SRD-05VDC-SL-C relay module is an excellent choice for most Arduino projects. It’s easy to use, reliable, and cost-effective. While it has some limitations, its advantages outweigh its drawbacks for the majority of applications. We highly recommend this module for anyone looking to control high-power devices with their Arduino.
Step-by-Step Guide: How to Wire a Relay to an Arduino
Now, let’s get into the practical steps of wiring a relay module to an Arduino:
- Gather Your Materials: You’ll need an Arduino board, a Songle SRD-05VDC-SL-C relay module (or similar), jumper wires, and the device you want to control (e.g., an LED, a motor, or an appliance).
- Connect the Relay Module to the Arduino:
- Connect the relay module’s VCC pin to the Arduino’s 5V pin.
- Connect the relay module’s GND pin to the Arduino’s GND pin.
- Connect the relay module’s IN (input) pin to a digital pin on the Arduino (e.g., digital pin 7).
- Wire the Device You Want to Control:
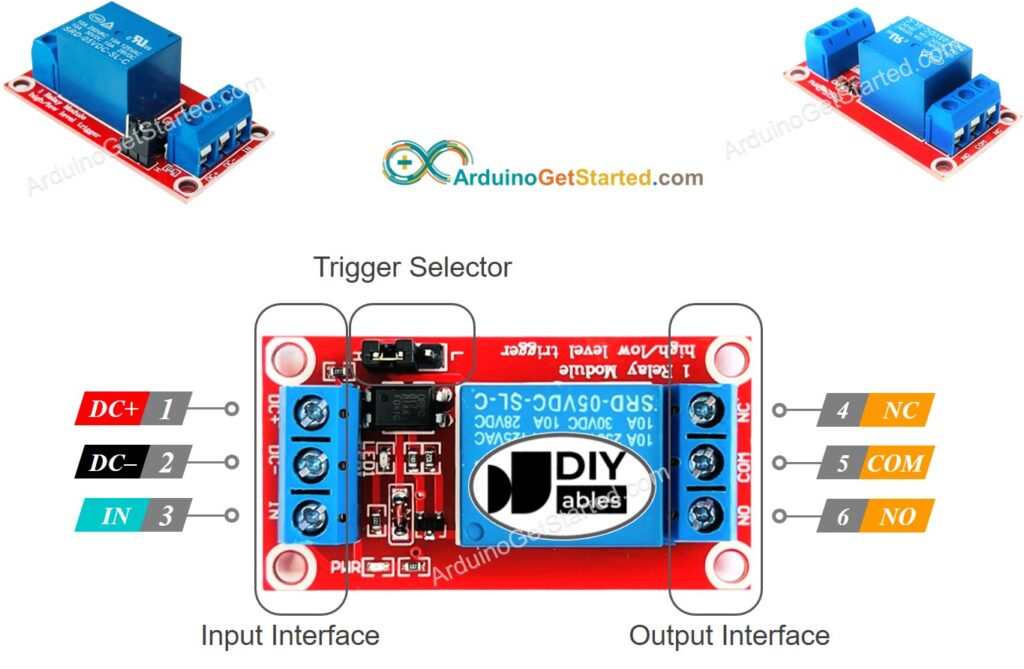
- Connect one wire from your power source (e.g., a battery or AC outlet) to the COM (common) terminal on the relay module.
- Connect the other wire from your power source to one side of the device you want to control.
- Connect the other side of the device to either the NO (normally open) or NC (normally closed) terminal on the relay module, depending on whether you want the device to be on or off when the relay is not energized.
- Write the Arduino Code:
Here’s a simple Arduino code example to control the relay:
// Define the relay pin const int relayPin = 7; void setup() { // Set the relay pin as an output pinMode(relayPin, OUTPUT); } void loop() { // Turn the relay on digitalWrite(relayPin, HIGH); delay(1000); // Wait for 1 second // Turn the relay off digitalWrite(relayPin, LOW); delay(1000); // Wait for 1 second } - Upload the Code to the Arduino: Connect your Arduino to your computer and upload the code using the Arduino IDE.
- Test the Circuit: Observe the device you’re controlling. It should turn on and off every second, indicating that the relay is working correctly.
Troubleshooting Common Relay Wiring Issues
Even with careful wiring, issues can sometimes arise. Here are some common problems and how to troubleshoot them:
- Relay Not Switching:
- Check the wiring connections to ensure they are secure.
- Verify that the Arduino is providing enough voltage to the relay coil (5V).
- Make sure the relay module is functioning correctly by testing it with a separate power source.
- Device Not Turning On/Off:
- Check the wiring connections to the device and the relay module.
- Verify that the power source is providing enough voltage and current to the device.
- Make sure the relay is connected to the correct NO or NC terminal.
- Arduino Resetting:
- This could be due to voltage spikes from the relay coil. Ensure that the relay module has a flyback diode.
- Try adding a capacitor across the relay coil to suppress voltage spikes.
- Relay Module Getting Hot:
- This could be due to overloading the relay. Make sure the device you’re controlling is within the relay’s current and voltage ratings.
Taking Control with Arduino Relays
Mastering how to wire a relay Arduino empowers you to control a wide range of devices and automate countless tasks. By understanding the fundamentals of relays, selecting the right module, and following the proper wiring techniques, you can unlock the full potential of your Arduino projects. Remember to always prioritize safety and double-check your connections before applying power. With a little practice, you’ll be controlling appliances, motors, and more with ease!
We encourage you to share your experiences with Arduino relays in the comments below. What exciting projects have you built? What challenges have you overcome? Your insights can help others learn and grow in the world of electronics.
